Ms. Hart and I have been meaning to repurpose/recycle some clay for a while now. With today being Lower and Middle School conference day we had some mutual free periods and were finally able to start the process. It is messy, but not nearly as difficult as I thought it might be. I started with these two references from my Pinterest board.
We had a collection of different densities including a bucket of slip, some very dried out clay, and some in between. We ended up breaking down the bigger and drier pieces in a plastic bag with a mallet. Then we dumped it all into a huge bucket and added water. This is possibly my favorite part to listen to. The clay fizzes and whistles as air is released. So in a nutshell here is the process,
- Collect dried out clay, slip, etc.
- Break down
- Add to bucket
- Add water
- Mix thoroughly
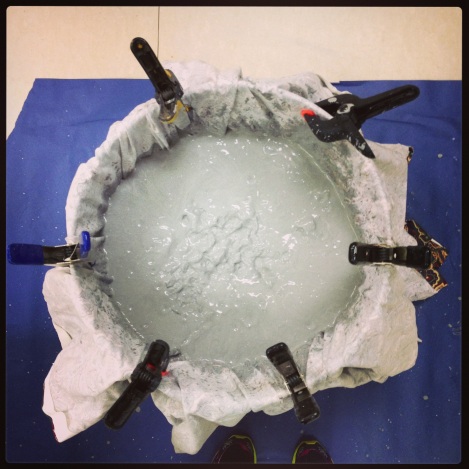
*We saw a few videos that used a hand blender, we just used our hands to break down the large pieces in the bucket and stir up the contents. - Create a contraption
*Ours was made from a metal trash can, piece of unwanted fabric, and clamps. The fabric is not touching the bottom of the can but rather suspended halfway down to allow excess moisture to leak through the porous material.

- Dump clay into contraption
- Let it sit for up to 24 hours. Monitor the amount of water lost.
- Break down and bag the clay for use
- WEDGE thoroughly!
For more excellent resources take a look at my Pinterest board for Ceramics


Hi Amy,
I’m so glad to hear that you’re having fun while recycling clay. We recently recycled some as well & found it tricky to work out the water. My friend (who does a lot of pottery) kindly donated a very handy tool (home-made). It is made out of plaster-of-paris, and looks like a very thick, large plate. Ours is about 15″ in diameter & about 3-4 inches thick. After soaking our clay overnight, we set our very mushy clay on this ‘plate’. In less than one day, our clay was ready to remove from the plate & was almost completely workable. It sure was a lot easier than other ways we had tried to get the water out!
I’m sure I’ll be posting pictures soon, so let me know if you’re interested in finding out a bit more. 🙂
Very nice work, by the way!
Colleen Rose
Thanks so much for the suggestion. Next time I have the plaster out I will try to get a mold big enough to make one of those plates. I have seen them before and it sounds like an awesome idea. I can’t wait to see yours.